The Pfister Pasadena 8 inch Widespread Faucet (in various finishes) provides an excellent upgrade to an older bathroom vanity (my upgrade was from a 1998 installation). The water turns on and off effortlessly in a quarter turn.
Installation is easy (taking out the old, rusty or otherwise corroded faucet is the hard part).
Here are some hints to make your experience more pleasant.
1. Instead of trying to turn the water off at each supply valve, just turn the water off at the entrance to the house. After a few years, the supply valves (some of which have plastic valve stems) become so corroded that (A) you can't turn them off all the way, (B) they will leak when you turn them back on or (C) both A and B will occur.
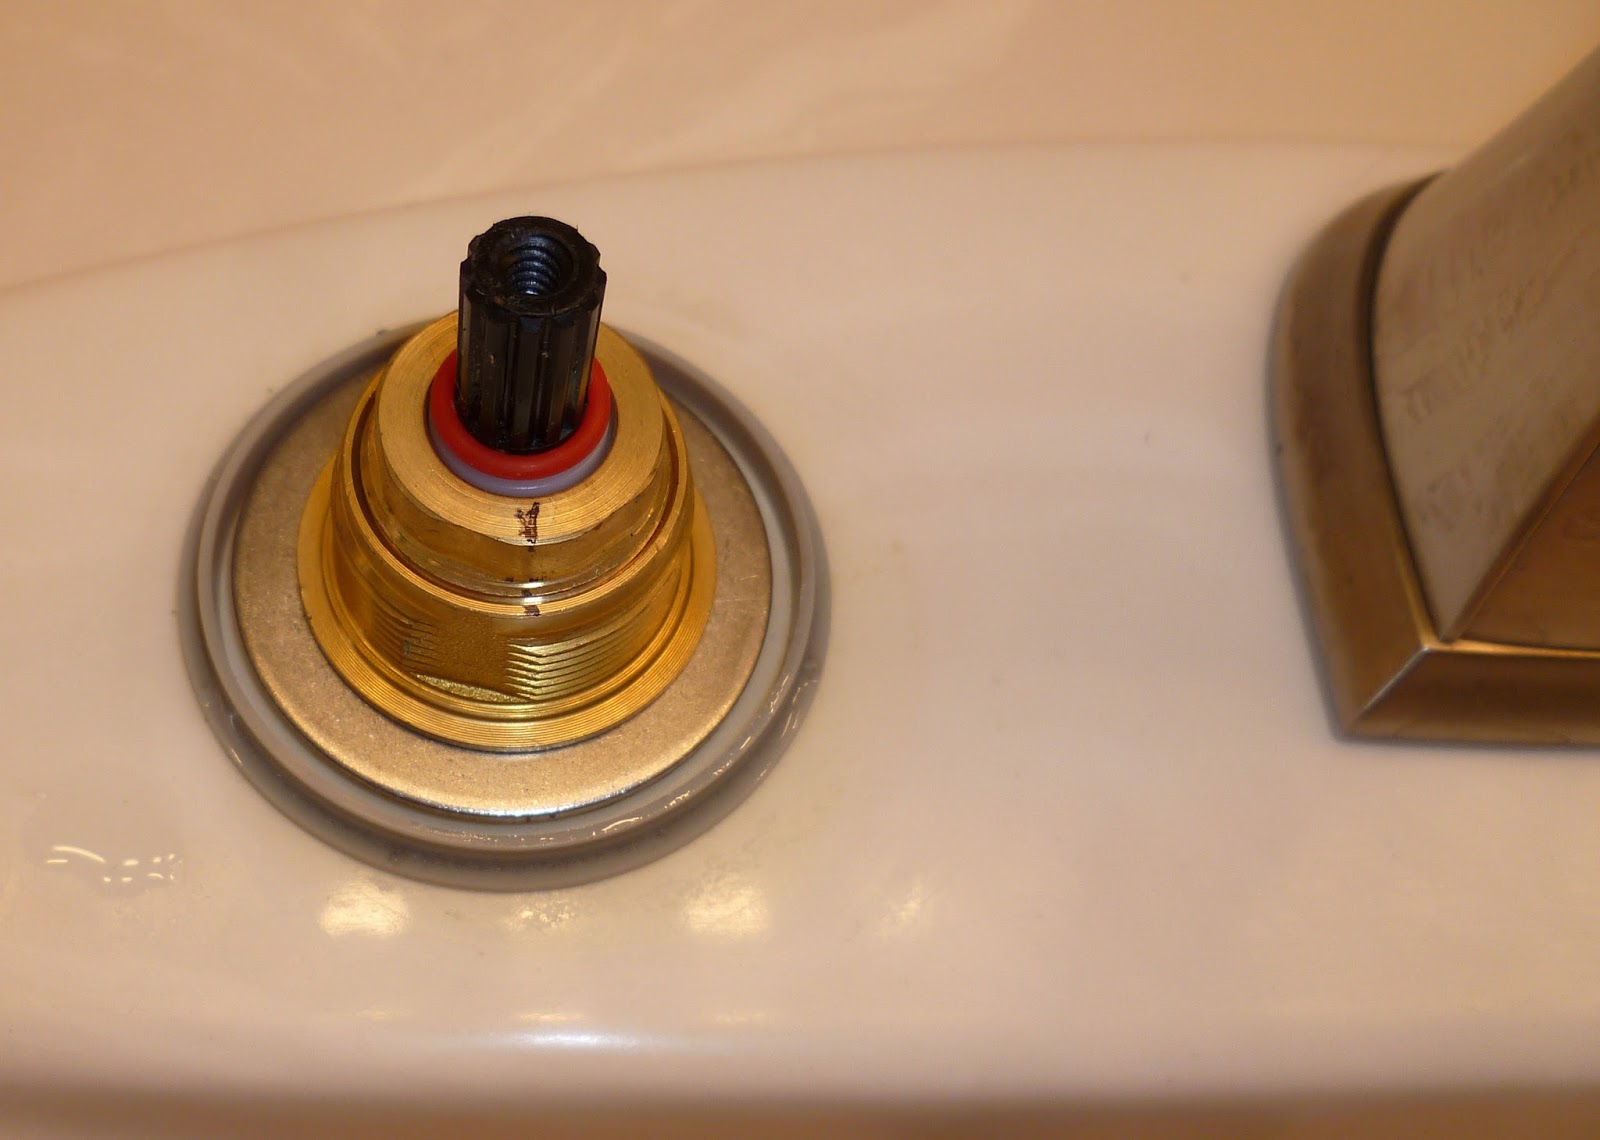
2. When installing each valve, you are instructed to make sure the arrow on the bottom of the valve points toward the sink. But as you tighten things up. the valve can rotate slightly. How can you tell without crawling under the sink again? Answer: Use a Sharpie to mark the valve body when it is lined up. See the photos here for clarification;
When the valve body is lined up (note the arrow shape in the red plastic pointing toward the sink), use a Sharpie to draw a line on the top of the valve pointing toward the sink. Now, if you accidentally turn the valve while tightening it, you can see and realign it.
3. When you install the sink stopper unit, it hand tightens underneath. Be sure to tighten it a few extra twists when it feels snug and then check for leaks as soon as everything is hooked up. I had to tighten the unit in both sinks when I thought they were tight enough.
4. I didn't find the included multi-tool to be of much use.
This is a nice set. I have used it only a month as of this posting.
Reviews of products and techniques, explanations of repairs I've made, and recommendations (and unrecommendations). Disclaimer: I'm describing what I did. If you attempt the same, do so at your own risk. Your mileage may vary.
Thursday, March 16, 2017
Thursday, March 2, 2017
Moen Single Handle Shower Faucet Repair
This is the repair that really drove home the meaning of "retaining clip." This repair also fulfills my advice to "talk about your mistakes."
The shower hadn't been used in more than ten years, so I wasn't surprised to find the faucet knob frozen. I turned off the water, went to the shower, and pulled off the cap, unscrewed the screw holding the knob on, pulled up and out on the retaining clip, and grabbed the valve stem with a pair of pliers. (Actually, they are Channel Lock adjustable pliers, what used to be called water pump pliers.)
That was mistake #1. After some twisting and yanking, I pulled out what I thought was the valve core and headed off to Home Depot to find a match. Mistake #1 was remedied by the helpful HD guy, who told me the part I was going to buy was wrong because I had removed only the central core of the valve stem. He gave me the right part and I returned to the shower.
Key Item: In the package with the new valve stem is a nylon tool that fits in the notches of the outer valve core. Put it on and then use the pliers to rotate the entire valve core so that it loosens enough to pull out.
I installed the new valve core (or stem) into the valve after slathering it with silicone grease and replaced the retaining clip. But now the metal cylinder that is supposed to slide over the valve body wouldn't. The top of the retaining clip was sticking up too high. Examination of said clip revealed that it was kind of bent and wouldn't go all the way down. A search of the Home Depot and Lowe's web sites revealed that it was not a stock item. Mail order only.
Mistake #2. I was about to order, grumbling at the $4 to $5 shipping charge on top of a $4 to $8 charge for the clip, when my wife, who isn't much for tools, suggested I try a plumbing supply house. "OK Google" found one only a couple of miles from home.
It was a few days before I could return to the repair site with my nifty, new retaining clip, so of course I had turned the water on again in the meantime. (You can see where this is leading to Mistake #3, can't you?) So I step into the shower stall, grab my needle nose pliers, and yank out that bent old retaining clip. In a quite surprising demonstration of the retaining clip's name and purpose, the entire valve core instantly shot out of the valve body, followed by a fire-hose-like stream of water, aimed directly at my chest. For an old guy of 66, I'm not kidding that I dashed out of the shower, down the hall, through the entry way, out the front door and to the shut off valve for the house.
Cut to the chase. The valve core went back in, the new retaining clip slid all the way down, water turned back on, and all is right with the world.
Installation secret #1: Be sure to push the valve core all the way in so that the retaining clip can slide down. Twist the core to line it up so the clip slides in the grooves on the core
Installation secret #2: To be sure that twisting the knob left makes the water hotter and right colder, make sure the little tab on the knob stem part of the valve is facing up. If not, rotate it up.
Maybe the best idea is to get the whole kit at one time:
The shower hadn't been used in more than ten years, so I wasn't surprised to find the faucet knob frozen. I turned off the water, went to the shower, and pulled off the cap, unscrewed the screw holding the knob on, pulled up and out on the retaining clip, and grabbed the valve stem with a pair of pliers. (Actually, they are Channel Lock adjustable pliers, what used to be called water pump pliers.)
That was mistake #1. After some twisting and yanking, I pulled out what I thought was the valve core and headed off to Home Depot to find a match. Mistake #1 was remedied by the helpful HD guy, who told me the part I was going to buy was wrong because I had removed only the central core of the valve stem. He gave me the right part and I returned to the shower.
Key Item: In the package with the new valve stem is a nylon tool that fits in the notches of the outer valve core. Put it on and then use the pliers to rotate the entire valve core so that it loosens enough to pull out.
I installed the new valve core (or stem) into the valve after slathering it with silicone grease and replaced the retaining clip. But now the metal cylinder that is supposed to slide over the valve body wouldn't. The top of the retaining clip was sticking up too high. Examination of said clip revealed that it was kind of bent and wouldn't go all the way down. A search of the Home Depot and Lowe's web sites revealed that it was not a stock item. Mail order only.
Mistake #2. I was about to order, grumbling at the $4 to $5 shipping charge on top of a $4 to $8 charge for the clip, when my wife, who isn't much for tools, suggested I try a plumbing supply house. "OK Google" found one only a couple of miles from home.
It was a few days before I could return to the repair site with my nifty, new retaining clip, so of course I had turned the water on again in the meantime. (You can see where this is leading to Mistake #3, can't you?) So I step into the shower stall, grab my needle nose pliers, and yank out that bent old retaining clip. In a quite surprising demonstration of the retaining clip's name and purpose, the entire valve core instantly shot out of the valve body, followed by a fire-hose-like stream of water, aimed directly at my chest. For an old guy of 66, I'm not kidding that I dashed out of the shower, down the hall, through the entry way, out the front door and to the shut off valve for the house.
Cut to the chase. The valve core went back in, the new retaining clip slid all the way down, water turned back on, and all is right with the world.
Installation secret #1: Be sure to push the valve core all the way in so that the retaining clip can slide down. Twist the core to line it up so the clip slides in the grooves on the core
Installation secret #2: To be sure that twisting the knob left makes the water hotter and right colder, make sure the little tab on the knob stem part of the valve is facing up. If not, rotate it up.
Maybe the best idea is to get the whole kit at one time:
Tuesday, February 28, 2017
Kwikset Smart Key Rekeying Set
If you have a Kwikset Smart Key lock, this is the perfect solution for rekeying it. The kit comes with everything you need: the Smart Key tool, four new keys, plus two alternate keys, and easy and clear instructions. Rekeying took me about 30 seconds.
The only downside to the kit is getting it open. It's packaged in what seems like bullet-proof plastic. Be careful if you use a box knife to open it. It's tough. Opening the package took me at least five minutes, maybe ten.
A clearer way to describe the included keys is to say the kit includes one set of four keys and another set of two keys, allowing you to rekey your Smart Key lock twice (or change it back and forth). One suggestion is that you can use the two-key set (the "alternate" keys) to temporarily rekey the lock so that a repairman can have access to the house. After the repair or whatever is finished, you can rekey back to the other key set.
Finally, considering the cost of having keys made, buying a new lock cylinder, or hiring a locksmith, the price of this set is a bargain.
Highly recommended.
Caveat: You must have a Kwikset Smart Key lock to use this kit.
The only downside to the kit is getting it open. It's packaged in what seems like bullet-proof plastic. Be careful if you use a box knife to open it. It's tough. Opening the package took me at least five minutes, maybe ten.
A clearer way to describe the included keys is to say the kit includes one set of four keys and another set of two keys, allowing you to rekey your Smart Key lock twice (or change it back and forth). One suggestion is that you can use the two-key set (the "alternate" keys) to temporarily rekey the lock so that a repairman can have access to the house. After the repair or whatever is finished, you can rekey back to the other key set.
Finally, considering the cost of having keys made, buying a new lock cylinder, or hiring a locksmith, the price of this set is a bargain.
Highly recommended.
Caveat: You must have a Kwikset Smart Key lock to use this kit.
Monday, February 27, 2017
Epica 4 in 1 Immersion Hand Blender
Having seen and heard about hand blenders, I did some research on them and ended up with this midrange item. The Epica 4-in-1 Immersion Hand Blender sells for in the $40-$50 range. Hand blenders go as low as about $29 and as high as $100+.
The Epica is a nifty tool for whipping up smoothies and blended drinks in a flash. The stainless steel blade unit detaches from the motor and can be cleaned with a short stream of warm water. The unit comes with the blade attachment, a whisk attachment, and a small food processor attachment. I use the blade attachment with the plastic cup.
My drink of choice includes a banana, some blueberries, some pomegranate juice, yogurt, apple juice, sometimes a few prunes, some water soluble fiber, and five or six ice cubes. The blender liquefies this in about ten seconds.
Highly recommended. Excellent quality and performance.
The Epica is a nifty tool for whipping up smoothies and blended drinks in a flash. The stainless steel blade unit detaches from the motor and can be cleaned with a short stream of warm water. The unit comes with the blade attachment, a whisk attachment, and a small food processor attachment. I use the blade attachment with the plastic cup.
My drink of choice includes a banana, some blueberries, some pomegranate juice, yogurt, apple juice, sometimes a few prunes, some water soluble fiber, and five or six ice cubes. The blender liquefies this in about ten seconds.
Highly recommended. Excellent quality and performance.
Malwarebytes Anti-Malware Premium 3 Error Message System Not Fully Protected
Well, I've been around the block a few times on this one. I wanted my PCs to be fully protected, so I upgraded them from the free version of Malwarebytes to the premium version 3. Soon thereafter, my PCs began slowing down, not responding, and showing a Malwarebytes error message saying that Web protection had been turned off. I tried to turn it on, but it would either not respond or just say, "starting," and wander off into bitspace.
I contacted Malwarebytes technical support and they gave different suggestions on three occasions. I reinstalled, tried changing settings, rebooted, and so forth, to no avail.
To the chase: Finally, after a lot of research on the Web, I discovered that this issue has been known since at least 2014. It's this: Malwarebytes and Kaspersky antivirus/ Internet protection simply do not like each other. The solution was to uninstall Malwarebytes.
Question #1. Since this is a years' old issue, why doesn't Malwarebytes technical support know about it?
Question #2. Since this is a years' old issue, why haven't Malwarebytes and Kaspersky gotten together and fixed their incompatibility?
Bottom line: If you use Kaspersky antivirus, don't upgrade your Malwarebytes to the premium edition. If you already did and are getting these error messages and pulling out your hair, uninstall Malwarebytes 3 and ask for a refund.
I contacted Malwarebytes technical support and they gave different suggestions on three occasions. I reinstalled, tried changing settings, rebooted, and so forth, to no avail.
To the chase: Finally, after a lot of research on the Web, I discovered that this issue has been known since at least 2014. It's this: Malwarebytes and Kaspersky antivirus/ Internet protection simply do not like each other. The solution was to uninstall Malwarebytes.
Question #1. Since this is a years' old issue, why doesn't Malwarebytes technical support know about it?
Question #2. Since this is a years' old issue, why haven't Malwarebytes and Kaspersky gotten together and fixed their incompatibility?
Bottom line: If you use Kaspersky antivirus, don't upgrade your Malwarebytes to the premium edition. If you already did and are getting these error messages and pulling out your hair, uninstall Malwarebytes 3 and ask for a refund.
Tuesday, December 20, 2016
Pamase Kaiser Series Collapsible Trekking Poles Review
Before I saw these Pamase Trekking poles on Amazon, I looked at some dozens of poles. The main features I liked about these poles that made me choose them were the extended EVA foam handles, the advertised 7075 T6 aluminum, and the reasonable price for a first-time buyer.
Other features, or PROs:
+ Each pole comes collapsed in a plastic carry bag, netted on one side.
+ The wrist wraps are slightly padded for comfort. They adjust easily.
+ Rubber tips are included that press over the metal points. The rubber tips do not screw on, but they appear to be tight enough not to fall off.
+ Screw-on snow baskets are also included. They require some effort to screw on, so they will never come off by themselves.
+Assembly is easy, with the three parts sliding together and held by two spring-loaded locking pins.
+Adjustment is made by loosening the adjustable shaft by rotating it counter clockwise and then sliding the shaft up or down. Adjustment marks on each pole make it easy to match lengths.
+Advertised length adjustment is 38cm to 130cm or 15 inches to 51 inches. When adjusted to the desired length, the shaft is tightened by rotating it clockwise until tight. The adjustment is very tight and there is no slipping even under a reasonable amount of force.
CONs:
- When assembled, the poles have a small amount of looseness at the two joints, which creates the impression of fragility. Held suspended, they jiggle. However, as soon as any amount of weight is placed on the poles, they firm up and exhibit only the expected amount of flexing produced by aluminum tubing. Confidence in the poles is therefore quickly restored.
- On city walks (asphalt, concrete, stone) the poles are noisy when the rubber tip plunks down on the hard surface.
- The poles are advertised as having "anti-shock." On some poles I looked at, this meant the presence of a spring in the shaft, to absorb the impact of planting the pole. These poles do not have such a spring.
In Use:
These poles are functional and perform well. Once you adjust to the jiggle, they are fine.
Verdict:
If you need portability (such as a luggage fit), these will work. Would I buy these again? Well, if I wanted a second set of poles, there are so many available I'd probably find something different just to have something different. And since right now I don't need disassembling poles, I'd get a pair that don't come apart.
Bottom Line:
These are a quality product at a great price. Recommended.
Other features, or PROs:
+ Each pole comes collapsed in a plastic carry bag, netted on one side.
+ The wrist wraps are slightly padded for comfort. They adjust easily.
+ Rubber tips are included that press over the metal points. The rubber tips do not screw on, but they appear to be tight enough not to fall off.
+ Screw-on snow baskets are also included. They require some effort to screw on, so they will never come off by themselves.
+Assembly is easy, with the three parts sliding together and held by two spring-loaded locking pins.
+Adjustment is made by loosening the adjustable shaft by rotating it counter clockwise and then sliding the shaft up or down. Adjustment marks on each pole make it easy to match lengths.
+Advertised length adjustment is 38cm to 130cm or 15 inches to 51 inches. When adjusted to the desired length, the shaft is tightened by rotating it clockwise until tight. The adjustment is very tight and there is no slipping even under a reasonable amount of force.
CONs:
- When assembled, the poles have a small amount of looseness at the two joints, which creates the impression of fragility. Held suspended, they jiggle. However, as soon as any amount of weight is placed on the poles, they firm up and exhibit only the expected amount of flexing produced by aluminum tubing. Confidence in the poles is therefore quickly restored.
- On city walks (asphalt, concrete, stone) the poles are noisy when the rubber tip plunks down on the hard surface.
- The poles are advertised as having "anti-shock." On some poles I looked at, this meant the presence of a spring in the shaft, to absorb the impact of planting the pole. These poles do not have such a spring.
In Use:
These poles are functional and perform well. Once you adjust to the jiggle, they are fine.
Verdict:
If you need portability (such as a luggage fit), these will work. Would I buy these again? Well, if I wanted a second set of poles, there are so many available I'd probably find something different just to have something different. And since right now I don't need disassembling poles, I'd get a pair that don't come apart.
Bottom Line:
These are a quality product at a great price. Recommended.
Saturday, October 8, 2016
Neewer® NW320 TTL LCD Display LED-Assistive Preview Focus flash Speedlite Review
The one issue with my Sony A 7II is that the 28-70mm lens is slow, shooting at the equivalent of F 3.5 to 5.6. In indoor light, some lighting enhancement is desirable. And in outdoor situations where bright sun and objects create half-shaded faces and scenes, some fill-in light would be useful. Enter the Neewer® NW320 TTL LCD Display LED-Assistive Preview Focus flash Speedlite for the Sony A 7II. It fits onto the camera's hotshoe and operates with TTL (Through the Lens) logic, adjusting camera settings for the amount of light, leaving you with a nearly perfectly exposed shot, most of the time.
The Neewer NW320 is only rated at 32, which is a modestly powered unit (compare speedlites at up to 180 or more), but it is great for portraits, small groups, museum objects, plants, flowers in the shade, and so forth. The light power is great up to about 8 feet.
For the entry-level price, this unit is great for those who want to experiment with an on-camera flash before committing to a $400 one. The flash head tilts up and includes a diffuser for adjusting results.
Four Stars
The Neewer NW320 is only rated at 32, which is a modestly powered unit (compare speedlites at up to 180 or more), but it is great for portraits, small groups, museum objects, plants, flowers in the shade, and so forth. The light power is great up to about 8 feet.
For the entry-level price, this unit is great for those who want to experiment with an on-camera flash before committing to a $400 one. The flash head tilts up and includes a diffuser for adjusting results.
Four Stars
Subscribe to:
Posts (Atom)

